It's been quite some time since I reviewed something and I decided to talk (write) about my current foundations and concealers. I don't have that much to review and I definitely don't have capacity to review brand products (for example all foundations and concealers from brand Maybelline). I also just randomly purchased these foundations and concealers based on my skin tone and based on a very very poor choice available in the dutch drugstores ( I live in Netherlands).
Actually most of them are very good, I'm using them a lot but there are some I prefer slightly more and I will explain further why.
 |
| no foundation on |
For comparison there is photo of my face without make up. There is some redness, discoloration, freckles and blemishes as well, so you can see on the photos with foundation and concealer on how good does it cover.
First I'm going to mention the name of the reviewed foundation and it's shade, and concealer as well. On a photo next to it there is foundation and concealer used on my face, little photo of the products themselves (as a proof that I actually have them and I used them) and also zoomed in part of my cheek where I have enlarged pores, some scaring, birth marks, bit of my under eye mimic wrinkles and part of my nose (where the most redness is) also with the foundation on so you can see how does it really look like from close up.
There could be little difference in color of these photo's because I was making them in front of window so I was using only daylight, no flash light and my camera makes photos which are not always 100% true colored.
Also, the foundations might be looking different on these photos than in reality but I did my best to make the photos as close as possible.
I will review foundations and concealers per brand. For certain brands I have no concealers so I won't be reviewing them.
I made photos of those foundations the same day so my face looked exactly the same with applying foundation and I also didn't use any primer in order to get the most of the foundation.
 |
| L'Oréal True Match in C2 Rose Vanilla |
L'Oréal
True Match foundation in shade C2 Rose Vanilla
True Match Touche Magique Concealer pen
"No match for me"

This is quite good foundation, medium coverage, nice matt finish - very good for women with very smooth skin. I however have very textured skin, I have acne scars and enlarged pores (which look like little holes in my skin from close-up view). What this foundation does is, that is starts sitting in those pores and scares and in the wrinkles as well and it makes them look more visible. That's one minus. Another minus for me is the color. For me foundation with name "C" (for cool, W for warm, N for neutral) should be having yellow undertone in it. This one unfortunately has red undertone therefore I'm not very happy with it. If you however have red undertone skin, it might be perfect. Maybe the name "rose vanilla" refers to red undertones but how about the name C? It is just very confusing. Maybe I picked up a wrong color, but there was not much choice. On the website there are 3 color shades from each lightness level (C1, W1, N1, C2, W2, N2...etc) but there are very hard to get in the shops in this (full) range. Still, C2 should be yellow, not red.

Concealer is very good though. I assumed that's meant to be under eye concealer - considering it's texture and packaging (liquid concealer in pen).
It covers very nicely, it doesn't set in the wrinkles, it doesn't move much through the day and pigmentation is very decent.
It comes with little brush from which comes out the product after you twist the bottom but I really don't recommend to apply it directly under your eyes because that brush is very very stiff and that's definitely not gentle to your skin.
I mostly get some product on back of my hand and I apply it with a finger under my eyes.
I wouldn't use it for blemishes or anything tricky to cover because it's way too light (texture) so it wouldn't cover much.
Also, it's very good for light to medium under-eye darkness but it wouldn't cover bad discoloration or too dark under-eye area.
You can also use it as a highlighter for your cheekbones, forehead, nose, chin, etc.
 |
| Maybelline Super Stay 24H in 030 Sand |
Maybelline Super Stay 24h foundation (030 Sand) & concealer (2 Light, 3 Medium)
"good coverage, no clogging"
I have to say that I really love this foundation. It is amazing for this price and a fact that it's a drugstore brand.
It is very pigmented, formula is liquid but much thicker texture so you have to blend it well - and it goes on the best when you apply it with your fingers.
It stays on all day long - of course it won't be looking exactly same as after you put it on, no foundation does, but it is pretty "long lasting".
The coverage is also very good. It covered my freckles and redness without any problem and I really had to apply just very thin layer, which is quite surprising.


The micro-flex stretch formula provides that this foundation adjusts itself to your skin - and it really works - in my experience.
It doesn't set in wrinkles or pores (therefore no "clogging") so that's a huge plus.
Color shade is also very good. Nice yellow/neutral undertone, no reds so that's something I am very satisfied with.
I have 2 concealers from the same Super Stay 24h line and I am not very fond of them.
They are liquid concealers with bit thicker and dryer formula so they are supposed to stay on blemishes and cover any spots or discoloration - which they do, I have to admit.
I am not happy at all with the colors of these concealers - they were only 3 shades available in the store - numbers 1, 2 and 3. I picked up 2 and 3 from which number 3 has nice yellow/neutral undertone but it is way too dark for me (for covering up blemishes and redness) and number 2 has very ugly grey-ish red undertone and it doesn't match my skin at all. I can't imagine anybody whose skin it would match. So that's a minus. I also quite don't understand how these concealers look like in the packaging. There is kind of a sediment on the bottom of the bottle and I don't know what is it or why is it there. Is the product old, or did it go bad, or is that reaction on warmth or sunlight? I have no idea.
 |
| Max Factor Lasting Performance in 101 & 105 |
Max Factor Lasting Performance foundation (101, 105)
Pan Stik (concealer stick), Mastertouch Under-eye concealer pen (303 Ivory, 309 Beige) "amazing coverage, extremly natural looking"
When I tried this foundation on for the first time I was really amazed. So light formula and such an high pigmentation!
When you put this foundation on you don't even feel it. It is as light as an moisturizer. I put on just a little drop of this foundation (half pea size) and it is enough to cover my entire face. The coverage is the highest possible. It leaves on nice matt finish but deffinitely not dry and it is almost undetectable.
If you find a perfect shade and you put on only little amount nobody would find out that you are wearing foundation

I think that this foundation would work with any skintype.
The formula is just perfect, I can't say it enough.
I have shades 101 Ivory Beige and 105 Soft Beige. I mostly mix them up together because 101 is too light and 105 too dark - and again, there was no shade in between available in the store.

The minus point is that shade 101 is too red. Shade 105 is great, it's yellow undertone so it matches my skin perfect but it's too dark, as I have already mentioned. So the minus point is again - no color with good undertone in a lightness range.
The Pan Stik was a bit surprise for me because I didn't know wether it is foundation or concealer. The answer is simple - both! You can use it as a foundation stick or as an concealer. The coverage is very good, formula too but again - red undertone. So no match for me.
Under-eye concealers are very good. They don't set in wrinkles, they stay on, colors are perfect but they could be bit more pigmented. The L'Oréal's Touche Magique concealer pen has a better pigmentation in my opinion. So I would use this one only for light discoloration or light under-eye darkness, nothing too much of an challenge. It comes with little sponge applicator so you can apply it directly into your under eye area and blend it gently with your fingers or brush.
 |
| Vichy Dermablend stick 12 & 14 |
Vichy dermablend Ultra Corrective Foundation-Cream Stick (14 Nude, 12 Opal)
"perfect coverage, slight oily finish"
I purchased this foundation stick when the freckles on my left cheek turned into pigment spots (caused during pregnancy). I was so fed up by concealers and foundations I had not be able to cover these spots and I really needed something with super power. I have seen ad on this stick showing guy with tattoos and this foundation was supposed to cover them 99%.

Now after a year of using this foundation stick I have to say that it DOES cover a lot, it does cover more than common concealer but I don't find it capeable of covering tattoos. It has no super power and it doesn't make such a huge difference.
Though it's a very nice foundation, it covers very
very good, it is meant for people with normal to dry skin so it leaves a bit of oily finish - not too oily of course. Nothing which couldn't be fixed with powder.

Good thing about it is that you definitely don't need any primer under it. It is very thick and dry but after you put on your face it melts so you can blend it easily.
I apply stripes (directly from package) on my forehead, nose, cheeks, jaws and chin and then I blend them all over my face with my fingers.
With this technique you use only a little product and you can blend it very good.
I've seen women applying this with a stiff foundation brush but in my opinion this way you happen to apply way too much of a product absolutely unnecessarily.
This way it is also easy to use 2 colors at the same time - as I do. My nose, cheeks an forehead are mostly bit darker than rest of my face (these parts of the face are more exposed to sun than jaws, chin and temples) so I use darker foundation for this area and lighter for the rest of the face.
Another big plus of this foundation is that it doesn't clog the pores - it looks much better than foundation which does clog the pores and sets in them so they look even worse and it is also very good for skin itself - who would want to have blackheads?
I don't see any down side of this foundation, so I would highly recommend it to anyone who doesn't have oily skin and needs this kind of coverage.
 |
| Vichy dermablend 25 Nude |
Vichy dermablend Fluid Corrective Foundation 16HR in 25 Nude "the best of all"
After having such a wonderful experience with (above mentioned) Vichy stick foundation I decided to try also fluid/liquid version of Dermablend line from Vichy (which is pharmacy's cosmetics).
It was as I expected - another great foundation, extreme pigmentation, no pore clogging formula, long lasting effect - it has it all.
Although, this foundation feels very heavy and thick once applied on skin.

If you are used to it by wearing quite thick layer of foundation then it's not a problem but for me it's not very nice feeling.
I really prefer the "light weight" feeling of foundation on my skin otherwise I feel like I'm wearing a mask.
It is exactly opposite as I was talking about in Max Factor's Lasting Performance foundation - light foundation versus heavy foundation.
It's still very good foundation and I guess it's one of my favourites.

I wear it on daily basis mixed with Max Factor's Lasting Performance shade 101 Ivory Beige or with my new Pro Longwear Concealer from MAC.
This concealer is shade NC 20 so it is pretty light and yellow and if I mix it with this Vichy foundation the shade is perfect and it also gets much light-feeling formula.
I also normally put my GOSH primer underneath this foundation (mixture).
This foundation is developed especially for people with big issues such as huge pigment spots, bad discoloration, dark spots, light spots etc. but it's also very good for people who hate freckles.
You can see on the photo that it has covered my birth marks almost entirely and they are dark brown. It is not 100% coverage but on the other hand I put on just very tiny amount.
Maybe if you layer it, it might actually cover some spots or marks entirely.
This foundation is also supposed to be waterproof, which I have no experience with - I never go swimming with my make up on - but, when I put it on back of my hand to mix it with other foundation/concealer it stays on and I can't wash it off with only clean water. It needs some cream or oil and some definite rubbing to remove it. So, the waterproof part might be actually true.


 I started with applying white base all over my lid. Then I applied light beige matt shadow into my crease with light brown shadow on top of it.
 Then I started to apply colors on my lid. First I applied matt white into my inner corners. Then I applied bright pink (matt) from Sleek Acid Palette right next to the white. I blended it a bit so the transition between 2 colors would be smooth. I did the same process with all shadows I applied.

 First I applied base color (1) all over my lid. Then I applied transition color (2) into my crease. Then I darkened the outer V with darker shade (3) and blended it. Then I applied white kohl pencil into my inner corners and little bit onto lids. I applied light color (4) on top of it. I applied the lightest shadow (5) under my brow bone to highlight the area. Then I lined my upper lash line with black kohl pencil and I smudged it with dark shadow (3). Then I applied silver glitter gel liner on top of it in my inner corners. Then I applied lots of mascara on top lashes. Then I applied bronze waterproof eye pencil on my bottom lash line and I winged it out slightly. I put matt brown shadow (6) on top of it and smudged it a bit. That was it for shadows.


 I smudged this line a bit with same pink color I used earlier to make the transition smooth. I darkened the outer V with black shadow (from same palette). I repeated the same steps on my lower lid as well in opposite order (I started with blue and black, then shimmery light pink, than matt pink, then beige). Then I draw quite thin line with black gel eye liner, I winged it out quite much and I concentrated on making sharp lines in my inner corners. I smudged the top lash line with black eyeshadow to make it more "smokey". Then I applied silver eye pencil in my water line and I finished off with plenty of mascara on top and bottom lashes.

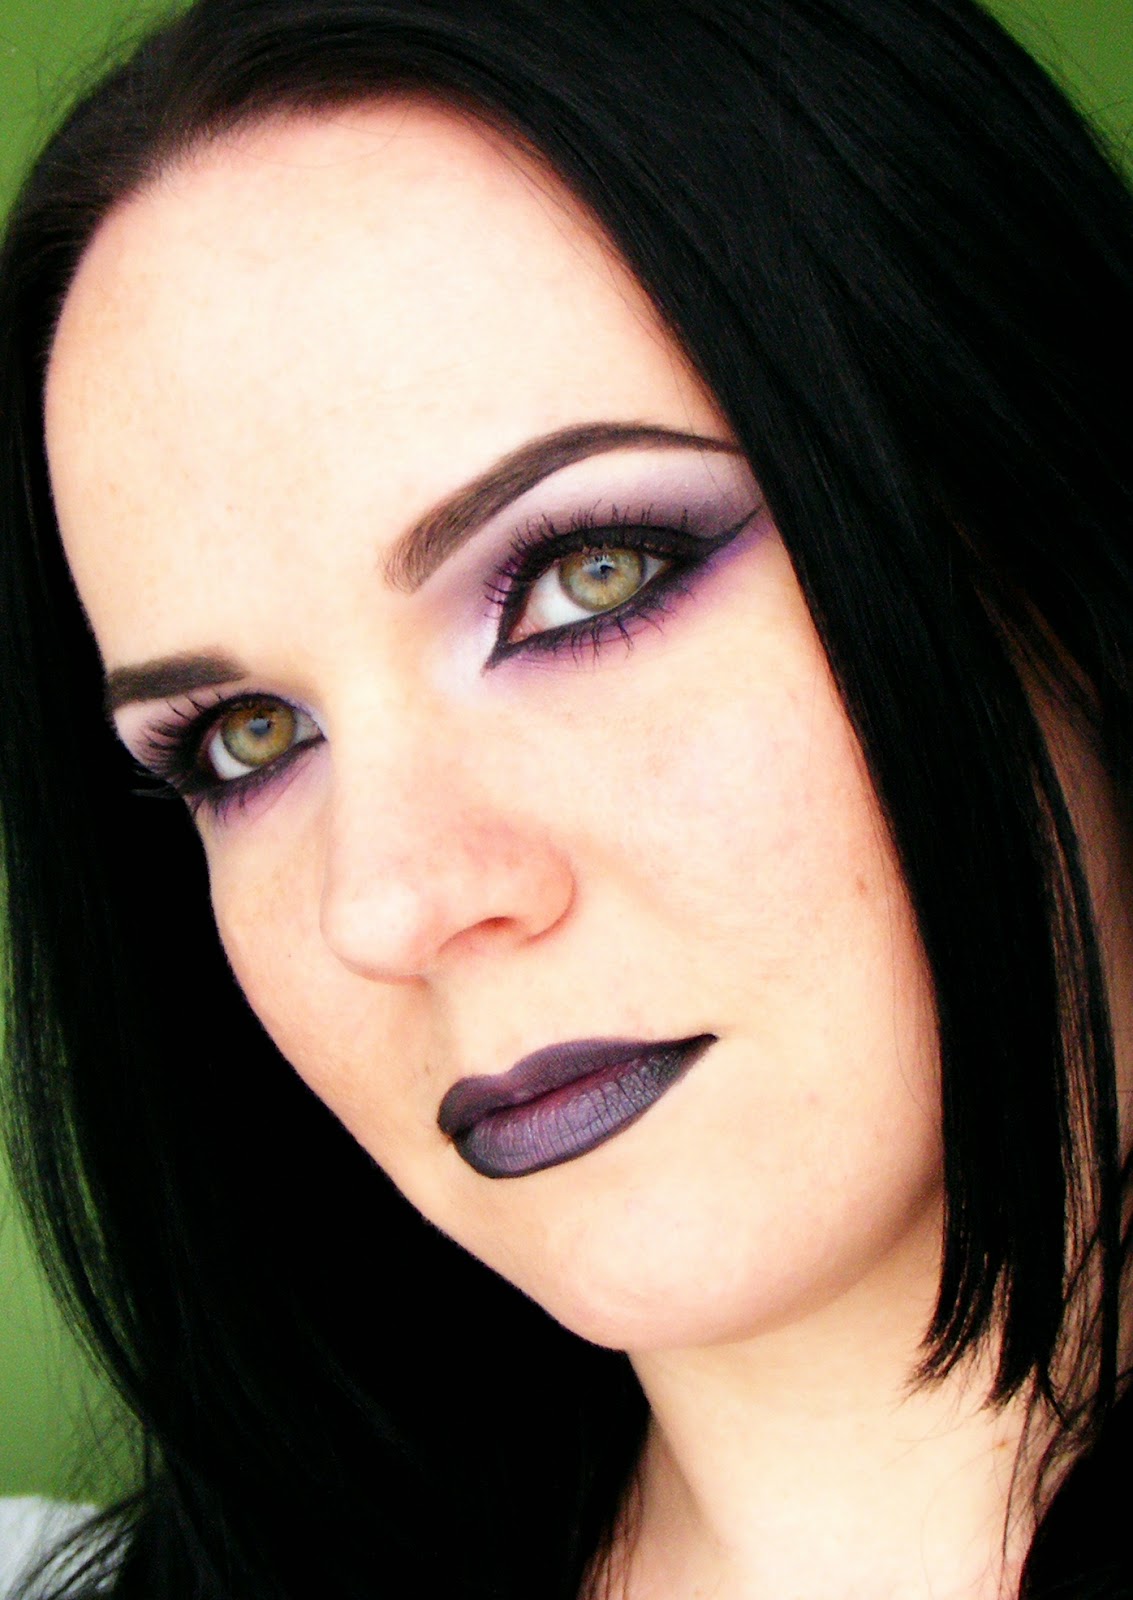 Anyway, this is my version of pastel goth make up. I started with white base all over my eyelid, and I used matt shadows only. First I applied white shadow into inner corners and to 2/3rds of my lids, then I applied beige and light brown into my crease as transition color, then I applied light purple onto my lids covering the white shadow a bit. Then I darkened the outer corners with deep purple and black and I winged it out quite far. I blended the edges with white shadow to get rid of any harsh lines.


 This is very simple and basic look - neutral eyes, not too dark, no liner just some mascara, foundation, concealer, highlight & contour combination,rosy blush, naturally defined brows, nothing too edgy and rosy pink lips for daytime look and burgundy red for evening look. Simple as that.


 I have already posted some pin-up/vintage looks. This one is specifically 50's look. Only with bit of a modern twist. What makes it 50's ? All over matt first of all. I only used matt eye shadows, no highlighters, no shimmer what so ever. Second thing is medium thick eye liner. In 50's was the eyeliner not so crazy yet, it was applied only to top lash line and extended a bit. The brows used to be much thicker than at 40's, and quite defined, but still bit further from each other, higher and more arched then I made them for this look. And the lips - all time classic - bright red.
 It has been a while I created a look with neutral colors and I thought now would be a time for it - after all previous blues, bronzes, browns and greens looks on this blog.
 I applied the same white pencil onto my waterline. Then I moved on to the liner. I applied quite thick line from my very inner corners to outer corners where I extended it towards brows to achieve elongated eye effect. Then I put white pencil right under this extended part to make it even more defined. Then I applied that same matt taupe eyeshadow on my lower lid as
 well. Then I made second wing (line) with black eyeshadow. After I was done with shadows and eyeliner, I put on 3 coats of mascara to my top lashes. I was thinking about using false lashes but I decided not to use them - my lashes are quite thick and long so I don't need false lashes anyway.


