Showing posts with label Rock chick. Show all posts

Friday, January 8, 2016

Taupe all over

First I primed my eyelids. I used Maybelline Color Tattoo cream eyeshadow in shade Taupe. I applied it all over my eyelids (top and bottom) and I blended the edges outwards so I wouldn't have any harsh lines. Then I applied cool toned brown matte eyeshadow (Inglot 342) on top of it to avoid creasing and to intensify the color in the outer V's (also top and bottom lids).

I blended this shade pretty high almost to my browbone and I blended the edges with a white matte eyeshadow (Inglot 373) which I also applied under my brows to highlight my browbone. Next I lined my top and bottom lashline with Essence Long Lasting eye pencil in shade 01 Black Fever. I tried to be as precise as possible. I extended the line in the inner and in the outer corner of my eyes. Afterwards I set the pencil line with a black matte eyeshadow (Rimmel Glam eyes  in shade 214 Jet Black) and I blended it slightly to achieve more smokey effect. I blended quite well on my bottom lids to achieve larger eye effect. It also turned bit grey during the blending process so I applied the same brown eyeshadow I used earlier below the black one to cancel out the grey. Next I applied a very thin line using my Catrice Liquid Liner Waterproof 010. Then I added some highlight to my inner corners using Bourjois Light Concentre de Lumiere eyeshadow in shade 03.
Then I cleaned all fallouts and applied my Smashbox Photo Finish foundation primer all over my face. Instead of a foundation I mixed 2 shades of MAC Pro Longwear concealer - NC 15 and NC 25 and applied a very thin layer all over my face. I used my fingers because I wanted a very thin layer and with this technique I get the most control.
I also did cream contouring which I don't do very often but I wanted this make up to be long lasting. I applied the darkest cream concealer I have from my beauty88 concealer palette under my cheekbones and I blended it with contouring brush. Then I concealed the darkness under my eyes using Vichy Dermablend foundation stick in shade 12 Opal. Afterwards I set everything with white loose powder from Grimase and then I went over the contoured areas again with brown eyeshadow (Revlon Colorstay in shade 05 Hazelnut). Next I defined my brows using Maybelline Color Tattoo cream eyeshadow (which is awesome and hell cheaper alternative to Anastasia Beverly Hills dipbrow pomade) in shade black. Then I brushed them through with a clear brow gel.
I also applied mascara to my top and bottom lashes. I first used Max Factor Clump Defy and then I used Max Factor Wild Mega Volume mascara.
Then I moved on to my lips. I first applied a thin layer of a liquid lipstick (Maybelline Super Stay 24 Color in shade 615 Soft Taupe). Then I (out)lined the lips with a taupe brown eyepencil and then I blended it with a second layer of the same liquid lipstick. After it dried I applied Inglot Freedom system eyeshadow in shade 342 (the same one I used on my eyes earlier) on top of the lipstick to achieve matte effect.

Monday, November 16, 2015

Grungy copper look using Sleek Sunset Palette

 I've started differently this time. I first primed my face using Dermacol Sheer Face Illuminator in shade Sun Bronze. Afterwards I applied my foundation on top of it. I used Mary Kay TimeWise luminous-wear liquid foundation in shade 4 Ivory. The combination of foundation and illuminator gave my skin beautiful fresh glow.

I concealed my under eye area using LA Girl Pro HD concealer in shade Natural and I set everything with Mary Kay Translucent Loose powder. I contoured under my cheekbones a bit using Inglot Freedom System Matte eyeshadow in shade 342.

Then I moved on to the eyes. I applied a bit of a concealer on my eyelids and I set it with powder. I highlighted my brow bone using Inglot Freedom System Matte eyeshadow in shade 373 and I applied shade 350 all over my eyelid. Then I applied coppery-red eyeshadow from Sleek Sunset palette on the moving part of my lids and I blended it upwards. I applied this shadow all along my lower lash line as well. Next I darkened the outer V's using cool burgundy shimmery shadow from the same palette. I darkened it even more using matte black shadow. I applied tiny bit of the golden eye shadow into my inner corners.
When I was done with applying and blending of eye shadows I lined my eyes using liquid liner from Catrice.
Next I applied L’Oréal Volume Million Lashes So Couture mascara on my top and bottom lashes.

I defined my eyebrows using Rimmel Glam eyes eyeshadow  in shade214 Jet Black.


Then I moved on to the lips. First I outlined them using Essence Long Lasting eye pencil 01 Black Fever and then I applied Max Factor Lipfinity color & gloss liquid lipstick in shade 550 Reflective Ruby. I blended the outline a bit before it dried in order to achieve bit of an ombre effect.


Thursday, October 15, 2015

Smoked out cat eye with ombre lips

 I've started with priming my eyes using MAC Paint Pot in Soft Ochre. I applied it in my crease all the way to my brow. Then I started forming my ´cat eye´ with black eye pencil L’Oréal Color Riche LeKajal 501 Black. I drew a thick line from my inner to my outer corner. Then I used L’Oréal Color Riche LeKhol 101 Midnight black to refine the line and sharp the points (especially my outer corners). Afterwards I began with applying my eyeshadows. I started from the lightest - the matte white one from Sleek Acid Palette. I applied it under my brows to highlight the area. Then I applied a cool beige shadow below the white one all the way to my crease (Inglot 350). Afterwards I started to deepen the crease using light brown matte eyeshadow (Inglot 342) and a matte black (Rimmel Glam eyes 214 Jet Black). I applied the black also on my black pencil line I created earlier and I blended it upwards a bit. Then I applied even darker black matte eyeshadow on top of the line to darken it (black shade from Sleek Acid Palette). I applied bit of the matte black also on my lower lash line and I blended it quite low. As a next step I applied a liquid liner from Catrice on my top and bottom lash line. I made very fine lines in my inner corners. I made the bottom lines a bit longer then the lines from top to give it more special look. Then I applied my W7 Get Set white eyeshadow base in my waterline and in the inner corners (between those fine lines I created with my liquid liner earlier). I set the base with the white eyeshadow.
Then I moved on to the rest of my face. I first applied Smasbox Photo Finish foundation base in my T-zone and Mary Kay TimeWise luminous-wear liquid foundation in shade 4 Ivory all over my face. I contoured using my beauty88.nl concealer palette and the darkest shade and I set it all with Mary Kay loose translucent powder. I set my contouring with light brown matte eyeshadow  (Revlon Colorstay in shade 05 Hazelnut). Afterwards I defined my brows using black brow pencil from Essence and black matte eyeshadow (Rimmel Glam eyes 214 Jet Black). I also brushed them through with clear brow gel. Afterwards I applied 2 mascaras - Max Factor Clump Defy and Rimmel Scandal eyes. Then I moved on to my lips. I lined them first with berry colored lip pencil and applied my lipstick - Maybelline Super Stay 14H Lipstick 260 Always Plum. Then I darkened the inner corners of my mouth with the black matte eyeshadow (from Sleek Acid Palette) and applied the fuchsia color in the centre (from Sleek Acid Palette as well). That was it for the look.


Tuesday, September 22, 2015

Burgundy smokey eyes

I've started with applying cream-powder eyeshadow (Bourjois Color Editon 24H Cream to Powder texture Prune Nocturne) all over my top and bottom lid. Then I blended the edges using beige matte eyeshadow from Sleek's Au Naturel palette. Then I highlighted under my brows using matte white eyeshadow from the same palette. Then I blended the edges under my bottom lid with the same beige eyeshadow. Afterwards I darkened the outer edges with dark matte burgundy eyeshadow and blended it well. I made the outer-V's even darker with matte black eyeshadow. To make the burgundy color stand out more I applied the plum pigment from Kryolan onto the moving part of my top lids and bit on the bottom lids as well.

Then I applied black liquid eyeliner on my top lashline and I extended it a bit towards the end of my brows. Next I applied my MAC's Pro longwear concealer in NC15 instead of a foundation and I set it with the lose powder from Mary Kay. Then I contoured a bit under my cheekbones using medium brown matte eyeshadow (Inglot 342). I defined my brows with black brow pencil and I brushed them through with clear brow gel afterwards. I finished off my eyes with mascara. I used Rimmel's Scandal eyes. As a last step I applied my lipstick. I used Maybelline's Super Stay 14 h lipstick in shade 260 Always plum. 

Monday, June 22, 2015

Midnight blue smokey eyes


Instagram post of this look
This is actually pretty simple look once you know the "trick" of making basic smokey eyes.
I started with applying creamy black shadow as a base all over my eyelid towards brow bone. You can use soft black kohl pencil as well - whatever works for you. The idea is to create sticky black base so the black shadow will be very intense and it won't crease nor move. Then I applied neutral beige-brown shadow into the crease in order to blend hard edges created by creamy black shadow. Then I applied white matt shadow under my brows to highlight the area. Then I applied matt black shadow onto sticky base I applied earlier with creamy shadow. Then I applied black kohl eyepencil into my lower lashline and afterwards I applied same matt black shadow on top of it. I spend a while blending the black shadow in order to get rid of all harsh line and to make it "smokey". Then I used very beautiful lilac pigment on top of the matt black shadow in order to add more color. I was very precise in inner corners and I applied into 2/3rds of the top and bottom lid. It turned out to be more purple/blue because of black shadow underneath. I finished off with plenty of mascara.
Rest of the face was my basic routine - primer, MAC pro longwear concealer, powder, light contouring and black brows. I used neutral pinky/taupe lipstick.

Wednesday, April 8, 2015

Khaki smokey eyes

This look is very simple. I started with waterproof creamy golden eyeshadow all over my eyelids (top and bottom). Then I applied matt beige shadow into my crease and blended it with white matt shadow to get rid of any harsh edges. Then I applied shimmery khaki eyeshadow onto my lids. Then I applied medium brown into outer V to deepen it a bit. I applied same shadows onto my lower lid as well. Then I lined my eyes with black gel liner (top lash line, waterline, 1/3rd of bottom lash line). I finished off with plenty of mascara.  I've followed my standard face make up routine - primer, concealer, loose powder, contouring, brows and lipstick.

Thursday, February 12, 2015

Black&white cut crease cat eye

This is one of my very dramatic looks inspired by 60's Mod style combined with cat eye. I've chosen to use black and white to make it appear even more "edgy".

I didn't use any false lashes but they would have been perfect for this look.

 I couldn't decide on lip color, I first wanted to use bright red but then I thought I should better keep it more neutral since the eyes are so dramatic. But feel free to use any lip color you wish. Dark red or pink would look awesome as well.


How to achieve this look:

Prime your lids first. I've used Paint Pot (soft ochre). Than mark your crease shape. I have slightly hooded lids so I went bit above my natural crease. I used black gel liner for it. Then I smudged it with matt black shadow. You may choose to go thicker (as I did) or thinner at this part.
 Then I blended the line slightly upwards with chocolate matt eyeshadow to bring bit warmth into the look and also to avoid black (in combination with white) to look blue-ish.
After brown was applied I blended it with matt beige shadow to make transition smooth. I applied matt white shadow under the brows to highlight the area.
Then I applied base for my white shadow onto moving part of my lid. I used white kohl pencil and I blended it with my finger. Then I applied white matt eye shadow on top of it. I made sure I wouldn't cross the black crease line I've applied earlier.
Then I moved on to eyeliner. I used L'Oréal's Gel intenza liner and I applied it from very inner corner of my eyes all the way out and I extended the line till it met the crease line where I connected them. Then I went with black matt shadow over it.
So, that's the whole trick on cut crease cat eyes. Rest of the make up is my standard rutine.

Friday, October 24, 2014

Fall plum/aubergine reverse smokey eyes feat. Sleek Vintage Romance eyeshadow palette


Fall is here and autumn trends as well. There would be no autumn without using lots of plum, violet, burgundy and aubergine shades - on lips, on eyes, on cheeks...everywhere.  I absolutely love these colors and I wear them on daily basis - mostly on my lips. I think it just looks amazing in combination with white or light skin. If you have also pale skin and dark hair, it will fit you perfectly for sure.
I thought that I will kind of combine those 2 "hits" of this season - plum eyes and plum lips.
I have used mainly Sleek Vintage Romance eyeshadow Palette which was released in autumn last year and it has mainly golden and plum-pink shades. There is also 1 silver shade which I used into my inner corners, dark gold one I put all over my lid area and I used plum-pink into my outer V's and all along the bottom lash line. That is also reason why is this look called "reverse smokey eyes" - which means that all the accent is on the bottom lid and lash line. The darkest colour (black gel liner) is in the waterline, then there is same plum color as on the outer V and it is blended with dark gold color I applied on the top lid. It is not very difficult to make, the trick is that all the colors have to be blended well and they have to fade out gradually - the transmission between colors have to be seamless.
With this look are both eyes and lips very strong therefore the colors have to match with each other. It doesn't specifically mean that they have to be exactly same colors, but they have to have same undertones (in this case blue) and be on same color scale (in this case cool).
Don't go too crazy on brows because with too defined brows it may look waaaaaaaaaay over done.
Keep them simple. I used dark grey shadow and clear brow gel for more natural look.
I applied quite generous amount of mascara, you can even put on false lashes - it would look even better and more glamorous.
Make sure that you skin looks as good as possible - conceal all blemishes, discolorations, dark circles, pigment spots, etc. Don't put on too much foundation thought, the skin has to look natural. I used the thinnest layer of full coverage foundation mixed with concealer. I always apply foundation just with my fingers, never with brush because with fingers I can control the amount better. With the brush I always apply more than I want to.
I did very light contouring and very very light blush because I wanted the lip color to stand out the most.


Products used:

Face:
GOSH Velvet touch foundation primer
Vichy Dermablend Fluid Corrective Foundation 16HR 25 Nude
MAC Pro Longwear Concealer NC 20
Vichy Dermablend Setting Powder (loose)
Sleek Face Form Contouring and blush palette 373 Light
Sleek Pomegranate 923

Eyes:
GOSH waterproof eye shadow stick “Love that Gold!”
Sleek Vintage Romance 
Sleek Ultra Matts v2
L’Oréal Gel Intenza Eyeliner 01 Pure Black
L’Oréal Volume Million Lashes So Couture mascara

Brows:
Rimmel mono matt eyeshadow dark grey/black
Catrice clear brow gel

Lips:
Maybelline Super Stay 
24 Color 240 Plum Seduction

Tuesday, August 26, 2014

Celeb look: Iggy Azalea inspired (graphic liner & bright lips)

This look is very basic yet classic and it reminds me of  50's if you would substitute pink lips with bright red. I really love fact that vintage fashion and make-up are "in" again, with modern twist but also authentic variation, which I personally like more. It is very easy to achieve this look, only tricky part could be the black graphic liner but once you learn the trick, it's simple. You might find lots of youtube tutorials how to do black liner, I personally do it this way:  http://youtu.be/irIABAPb_fo?list=UU6jgzx2g3nlbaYkd8EMweKA
I started first with applying primer all over my face (use the one which works with your skin the best, for me it's GOSH velvet touch).First of all I have applied concealer all over my eyelids (top and bottom) and I set it with matt eyeshadow which is similar to my skin tone. You can also apply some darker shadow to create more dimension to your lids (especially with hooded eyes).Then did my eyeliner with using L'Oréal black gel liner and I applied black matt eyeshadow on top of it. Then I applied foundation. I wanted something lighter than what I would usually wear, so I mixed 2 shades - Max Factor Lasting Performance in shade 101 (which is the lightest I could find, unfortunately it has red undertone, which is not matching my skin tone) and Vichy Dermablend in shade 25 Nude (this one is perfect match for my skin in summer). I set everything with L'Oréal True Match pressed powder and I did some light contouring under my cheek bones (towards temples as always). I didn't use any blush. After all "powdering" was done, I filled-in my brows, using Anastasia Beverly Hills Dipbrow pomade in Chocolate and I applied my favourite mascara - L'Oréal Million Lashes So Couture. I finished off with lipstick. I used this gorgeous bright hot pink from L'Oréal Infallible in shade 121.
BTW I have NO IDEA who Iggy Azalea is, I believe she's singer, but I'm not sure, therefore I can not say that I am a fan of her or anything like that. This picture was sent to me with request to do this look, so I tried to create a look inspired by this picture. I also didn't try to create exactly same look, I never do, and I also never do celebrity looks but celebrity INSPIRED looks (if it makes sense), for me it does make difference. I really hate to copy celebrity looks from 2 reasons - first of all - THEY ARE NOT REAL. All looks in magazines, or social media has been "photoshoped" which means graphically adjusted, therefore it is impossible to create exactly the same look -  and second reason why I don't like to re-create celebrity looks is that I don't have EXACT SAME PRODUCTS as have been used on those celebrity photos. You can try it with similar products but you won't achieve the exact result. So that is bit of an explanation why you won't find authentic celebrity looks on my blog.

Monday, June 30, 2014

3 looks in 1 (using W7 In The Buff)


For the first look just apply your foundation, set with powder, contour and highlight as usual, fill-in your eyebrows (for this look I have used Anastasia Dipbrow pomade in Chocolate). I used light brown eyeshadow to define my crease and light shimmery white (with salmon undertone) to inner corner of my eyes and under the browbone as well. Then I applied some mascara (Million Lashes So Couture from L'Oréal). Afterwards some neutral light brown lipstick (24h Super Stay from Maybelline). To finish off I applied nice glowy pinky blush. You can see that creating this look is nothing extra difficult and pretty quick. This look is very daytime appropriate, for work, school, pretty much any occasion where light make up is required.


If you wish to turn this look into something more outstanding and bit more dramatic all you have to do is apply thin line of black eyeshadow along the lashline and extend it towards your temples a bit which gives you nice cat-eye liner. And there you go - look number 2 is achieved!
It is very simple and quick as well, just make sure to use correct brush for applying your black eyeshadow because if you use brush which is too soft or too stiff you might get nasty fallouts all over your face and then it might be very tricky to remove it. If your (black) eyeshadow tends to leave fall outs, you might have to apply it while holding tissue under your eye (or use shadow shields). Don't make the line too harsh neither too thick. If you find the line not natural or too harsh, just smudge it a bit. You might also substitute black eyeshadow with black gel or pen liner.

If you want to switch from day time to night time look you might be able to do it in few minutes. All you have to do is apply black eyeshadow into outer-V and bit into the inner corners as well, make sure it's blended very well. To make it more vibrant, apply shimmery bronze or brown shadow directly onto centre of your eyelid (the moving part of course). Blend it with black shadow so transmission is smooth and you have no harsh lines. After you are satisfied with intensity move along to lower lid. Apply black shadow all over the lower lid and blend it. You might apply the shimmer bronze of brown on top of it. Use black kohl pencil (or gel liner) onto waterline (top and bottom). I have also applied that shimmery salmon white shadow into inner corners once again for more bright look - you might skip this step of you want. Or you can use some light golden shadow instead. It would look nice too.
To create of these 3 looks I have used W7 In the Buff Palette which is perfect duplicate (much cheaper version) of Urban Decay Naked 2 palette I believe. You can use whatever palette (or single shadows) you wish, result will be same....
I hope you enjoyed this article and I'm looking forward to your comments!

Wednesday, May 7, 2014

Metallic smokey eyes


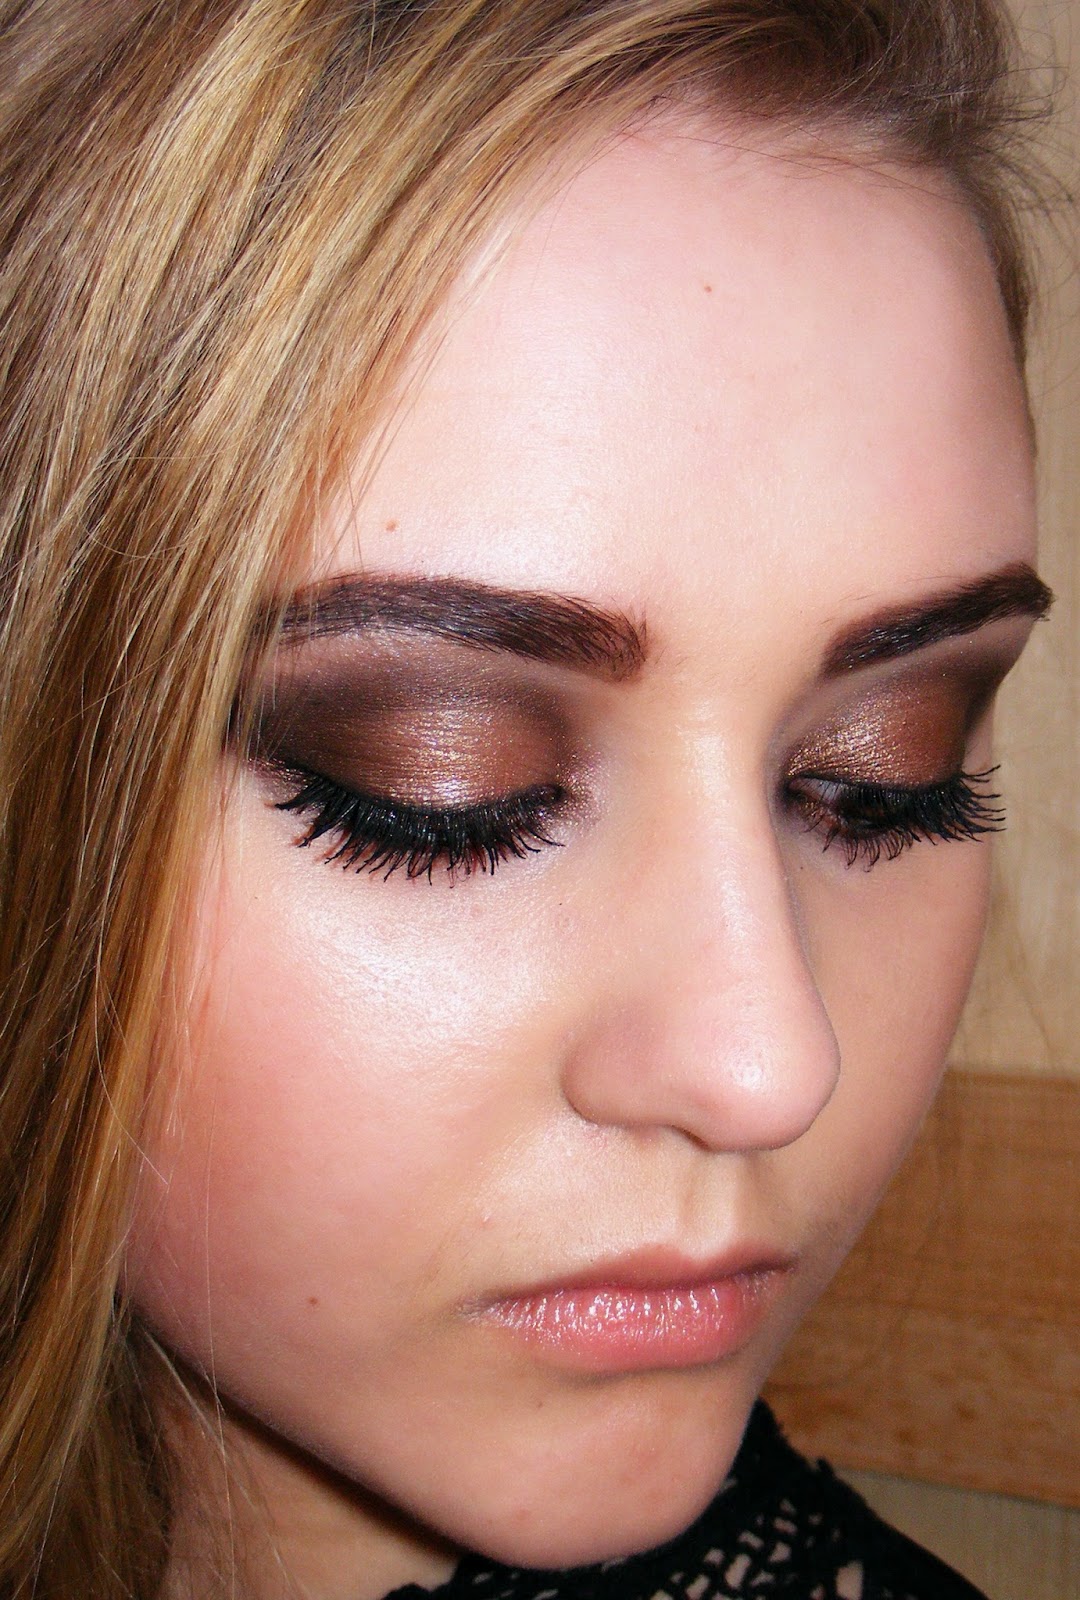
My model Djena has very beautiful big eyes and gorgeous full brows so I decided to enhance both of them. I went for very intense dark smokey eyes with metallic bronze-brown eyeshadow in the middle of the lid (using Sleek The Original palette). I have used only 2 eyeshadows - dark chocolate brown (pretty much all over the eye) and bronze metallic one (in the middle of the lid). To make it even more intense I dabbed the metallic shadow into eyelid with my finger instead of using brush. This way I also didn't get any fall-outs (which happens a lot with metallic shadows). I applied same eyeshadow onto lower lid and medium thick black gel liner (also into waterline). Lots and lots of mascara is very important for this look as well.


Tuesday, December 24, 2013

Winter grey smokey eyes

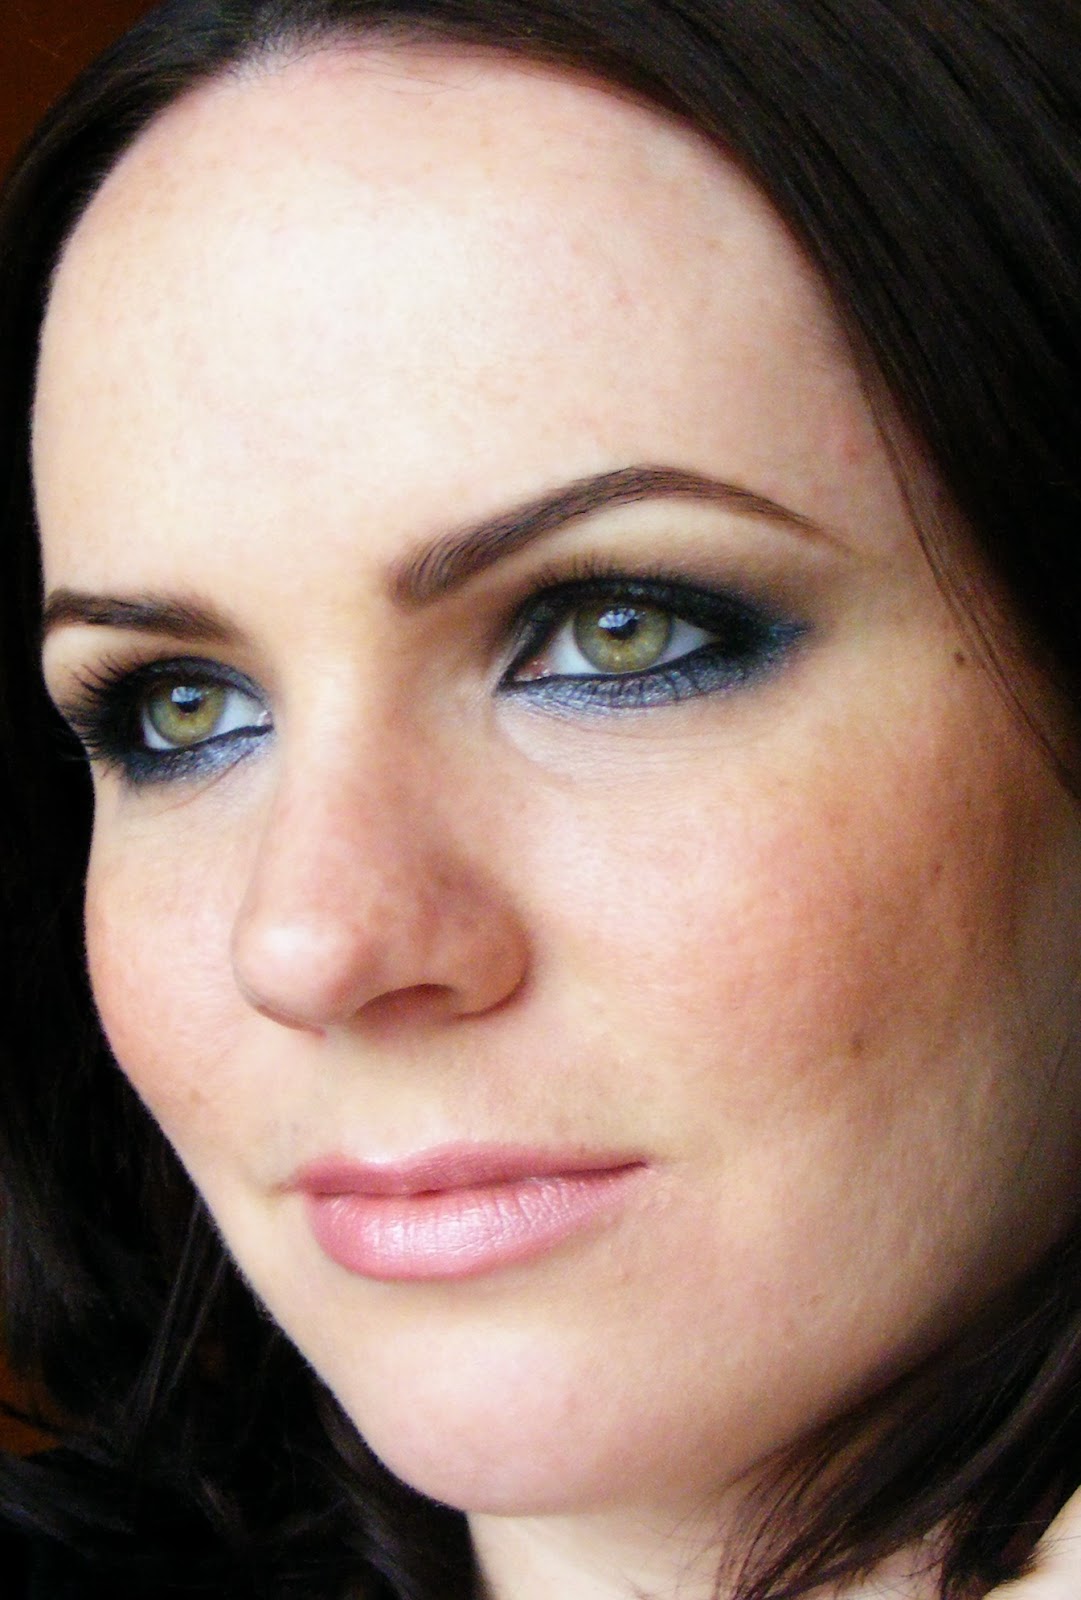
December is a month when I really like to wear smokey eyes. Still no snow, everything is grey and cold outside so what would be more appropriate then some nice cool-shaded  smokey eyes...Lots of women consider smokey eyes only evening or night wear appropriate. Well, smokey eyes are amazing for evening but it might be also cool for daytime - depending on many factors such as intensity of shading, or a season...I personally would not wear smokey eyes for daytime in summer or spring but I find them okey for autumn and winter (if it makes sense). Smokey eyes might have been bit extravagant in past but they get more and more popular, which is good news for women who like to go for bit more than standard light shadows-fine liner-bit of mascara-daytime look (me included). This look will just work amazing with women with light-coloured eyes such as green, blue, grey, hazel...anything which contrasts the dark shadows. You can also use shadows which will compliment your eye colour (dark grey or dark blue with blue eyes, dark green with green or grey eyes etc.) or shadows contrasting your eyecolour (brown or dark browns with blue or grey eyes, dark purple with green or hazel eyes etc.). Both effects looks beautiful. For this look I wanted to try out how will grey shadows work with my eye colour. I also didn't go too dark (shadows-wise) but I couldn't resist going crazy with black eyeliner. Little trick is to use black gel eyeliner in waterline. Common black kohl or eyepencil will never make such a strong effect. And of course - there is no smokey eye without very black, voluminous and defined lashes. To achieve this I have applied more than 3 coats of volumising mascara (list of products below).


Products used:

Eyes:

Sleek Eyeshadow Palette Storm nr. 578
Gosh Quattro eye shadow nr. 22 Driftwood
mascara: Max Factor False Lash Effect Fusion
L'Oréal Gel Intenza Eyeliner nr. 01 Pure Black


Face:
Vichy dermablend ultra-corrective foundation cream-stick shade 14 Nude and 12 Opal (as foundation)
 

Vichy dermablend Setting powder
contouring: Sleek Face Form contouring and blush palette 373 light 

blush: Sleek Blush nr. 921 Suede


eyebrows:
Catrice eyebrow set (powder)
Catrice lash brow designer clear shaping gel

Lips:

Max Factor Lipfinity nr. 008