For the first look just apply your foundation, set with powder, contour and highlight as usual, fill-in your eyebrows (for this look I have used Anastasia Dipbrow pomade in Chocolate). I used light brown eyeshadow to define my crease and light shimmery white (with salmon undertone) to inner corner of my eyes and under the browbone as well. Then I applied some mascara (Million Lashes So Couture from L'Oréal). Afterwards some neutral light brown lipstick (24h Super Stay from Maybelline). To finish off I applied nice glowy pinky blush. You can see that creating this look is nothing extra difficult and pretty quick. This look is very daytime appropriate, for work, school, pretty much any occasion where light make up is required.

If you wish to turn this look into something more outstanding and bit more dramatic all you have to do is apply thin line of black eyeshadow along the lashline and extend it towards your temples a bit which gives you nice cat-eye liner. And there you go - look number 2 is achieved!
It is very simple and quick as well, just make sure to use correct brush for applying your black eyeshadow because if you use brush which is too soft or too stiff you might get nasty fallouts all over your face and then it might be very tricky to remove it. If your (black) eyeshadow tends to leave fall outs, you might have to apply it while holding tissue under your eye (or use shadow shields). Don't make the line too harsh neither too thick. If you find the line not natural or too harsh, just smudge it a bit. You might also substitute black eyeshadow with black gel or pen liner.

If you want to switch from day time to night time look you might be able to do it in few minutes. All you have to do is apply black eyeshadow into outer-V and bit into the inner corners as well, make sure it's blended very well. To make it more vibrant, apply shimmery bronze or brown shadow directly onto centre of your eyelid (the moving part of course). Blend it with black shadow so transmission is smooth and you have no harsh lines. After you are satisfied with intensity move along to lower lid. Apply black shadow all over the lower lid and blend it. You might apply the shimmer bronze of brown on top of it. Use black kohl pencil (or gel liner) onto waterline (top and bottom). I have also applied that shimmery salmon white shadow into inner corners once again for more bright look - you might skip this step of you want. Or you can use some light golden shadow instead. It would look nice too.
To create of these 3 looks I have used
W7 In the Buff Palette which is perfect duplicate (much cheaper version) of Urban Decay Naked 2 palette I believe. You can use whatever palette (or single shadows) you wish, result will be same....
I hope you enjoyed this article and I'm looking forward to your comments!


 We were trying out make up for wedding and my model said: "Don't make it too soft, I like bright colours and big eyes". So, I thought blue is the right colour to go for. It was beautiful, I love cobalt blue soooooo much. It fits perfectly with black hair and grey/blue/green eyes (also amazing with brown eyes by the way). However we have decided that this might be too harsh for a wedding. Might be looking nice and fresh and different but if you look through the photos ten years later you might think: "Wow, that was crazy". So we put idea of having this make up for wedding aside, but it is definitely something you might wear for night out. I made brows very dark and defined because it evens out the brightness of the eyes. If you create very outstanding bright eye look it always makes eyebrows disappear (or it takes attention away from them). Therefore it is necessary to enhance the eyebrows (more than usually). I kept rest of the face matt, with medium dark contouring, very neutral blush and shiny light pink lips.


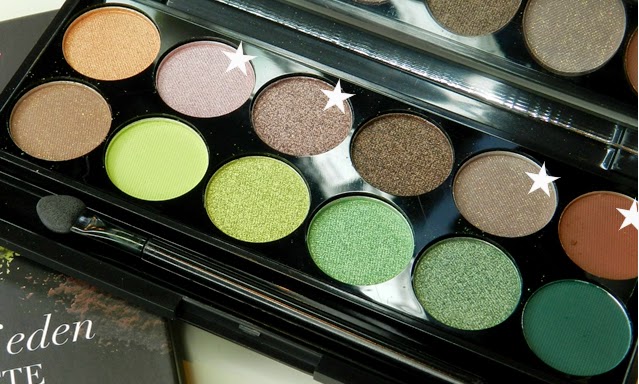
 I had very tired and red eyes today as a result of staring at the computer screen most of the day. So I was deciding quite a long time what colours should I use to hide the redness. Usually my go to look would be just some simple 60's look (I'm totally "pin-ed up" this season) using some warm browns for contouring. But with this amount of redness would warm brown only make it worse...so what is the best solution to hide red? Find something on red colour scale...and I figured already some time ago that lilac, lavender of any other shades of purple make redness disappear. Therefore I reached for my not-so-new Sleek Garden of Eden Palette. In some previous posts I have used the greens of this palette so today I have used the purples. Light shimmery lilac all over the lid, deep shimmery purple in outer lid, warm brown smudged with matt taupe in outer V. For lower lid I have first applied lilac/lavender eye pencil all over my waterline and lash line, then I applied the shimmery deep purple from Sleek palette into outer 1/3rd and shimmery lilac to the rest of the lower lid. After while the lavender pencil from waterline moved to lash area so I applied amazing new product from Catrice Made to Stay Inside Eye Highlighter pen. Works just great. It is kind of nude waterproof pencil which perfectly highlights the waterline and also doesn't move. It brightens the eyes instantly. I am using this product all the time I put on make up. Rest of the face make up is same old same old routine, brows as well. I still don't know what should I think about Anastasia Beverly Hills Dipbrow Pomade...product itself is great, I just find it looking way too harsh - even when I use shade Chocolate (which is actually 2 shades lighter than my black hair). Maybe I will give it few more tries to figure out how to use it the most flattering way. For the lips I went also for lilacs, I am really not a fan of purple lips but I guess that's okay with this look.


